


[FONT="]Sau khi hoàn tất quá trình đăng ký, cũng như cài đặt SSL (CRT) lên server hoặc các phần mềm quản trị web server. Việc chứng thực SSL của website hầu như đã hoàn chỉnh, bạn đã có thể kiểm tra việc chứng thực hoặc truy cập website bằng giao thức https.[/FONT]
[FONT="] [/FONT]
[FONT="]Để hoàn tất bước cuối cùng, cấu hình để website tự động truy cập thông qua giao thức https, bạn vui lòng tham khảo thêm hướng dẫn cấu hình từ bài viết sau:[/FONT]
[FONT="] [/FONT]
[FONT="]I. Cấu hình chuyển hướng sang https trên Linux (bao gồm cấu hình trên server linux và một số mã nguồn php thông dụng).[/FONT]
[FONT="]1.Cấu hình trên Apache[/FONT]
[FONT="]Bạn có thể dùng file .htaccess vốn luôn được hỗ trợ bởi các máy chủ chạy Apache. Mở file .htaccess và tìm đoạn sau:[/FONT]
[FONT="] [/FONT]
[FONT="]RewriteEngine On[/FONT]
[FONT="]RewriteCond %{<b class=”searchkeyword”>HTTPS</b>} !=on[/FONT]
[FONT="]RewriteRule ^.*$ <b class=”searchkeyword”>https</b>://%{SERVER_NAME}%{REQUEST_URI} [R,L][/FONT]
[FONT="]Hoặc[/FONT]
[FONT="] [/FONT]
[FONT="]RewriteEngine On[/FONT]
[FONT="]RewriteCond %{<b class=”searchkeyword”>HTTPS</b>} off[/FONT]
[FONT="]RewriteRule (.*) <b class=”searchkeyword”>https</b>://%{HTTP_HOST}%{REQUEST_URI}[/FONT]
[FONT="] [/FONT]
[FONT="] [/FONT]
[FONT="]2.Cấu hình trên Nginx[/FONT]
[FONT="]Chúng ta mở file cấu hình nginx.conf (hoặc /etc/nginx/sites-enabled/domain.conf) và tìm đoạn cấu hình cho website trên port 80, sau đó điều chỉnh như sau:[/FONT]
[FONT="] [/FONT]
[FONT="]server {[/FONT]
[FONT="]listen 80;[/FONT]
[FONT="]server_name yourdomain.com;[/FONT]
[FONT="]return 301 <b class=”searchkeyword”>https</b>://$server_name$request_uri;[/FONT]
[FONT="]}[/FONT]
[FONT="]Cuối cùng khởi động lại nginx: service nginx restart[/FONT]
[FONT="] [/FONT]
[FONT="] [/FONT]
[FONT="]3.Cấu hình trên Tomcat/JBoss[/FONT]
[FONT="]Đầu tiên bạn mở file cấu hình server.xml của Tomcat (thường nằm trong thư mục tomcat/conf) và tìm các đoạn cấu hình cho các port 80 và 443.[/FONT]
[FONT="]Trong phần cấu hình port 80 chỉnh lại như bên dưới:[/FONT]
[FONT="] [/FONT]
[FONT="]<Connector port=”443″ maxHttpHeaderSize=”8192″ maxThreads=”150″ minSpareThreads=”25″ maxSpareThreads=”75″ enableLookups=”false” disableUploadTimeout=”true” acceptCount=”100″ scheme=”<b class=”searchkeyword”>https</b>” secure=”true” SSLEnabled=”true” clientAuth=”false” sslProtocol=”TLS” keyAlias=”tomcat” keystoreFile=”/usr/local/ssl/keystore/server.jks” keystorePass=”your_keystore_password” />[/FONT]
[FONT="]<Connector port=”80″ enableLookups=”false” redirectPort=”443″ />[/FONT]
[FONT="]Tiếp theo đến file cấu hình web.xml của website và thêm vào đoạn sau đây ở cuối file, nhưng trước thẻ </web-app>[/FONT]
[FONT="] [/FONT]
[FONT="]<!– SSL settings. Only allow <b class=”searchkeyword”>HTTPS</b> access –>[/FONT]
[FONT="]<security-constraint>[/FONT]
[FONT="]<web-resource-collection>[/FONT]
[FONT="]<web-resource-name>Entire Application</web-resource-name>[/FONT]
[FONT="]<url-pattern>/*</url-pattern>[/FONT]
[FONT="]</web-resource-collection>[/FONT]
[FONT="]<user-data-constraint>[/FONT]
[FONT="]<transport-guarantee>CONFIDENTIAL</transport-guarantee>[/FONT]
[FONT="]</user-data-constraint>[/FONT]
[FONT="]</security-constraint>[/FONT]
[FONT="]Sau đó bạn cần khởi động lại Tomcat.[/FONT]
[FONT="] [/FONT]
[FONT="] [/FONT]
[FONT="]II. Cấu hình chuyển hướng sang https trên Windows (bao gồm cấu hình trên IIS các phiên bản).[/FONT]
[FONT="]1.Cấu hình chung[/FONT]
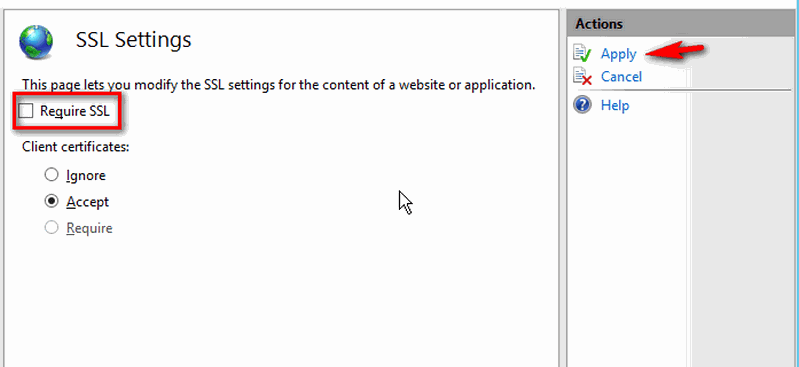
[FONT="]Đầu tiên chúng ta khởi động Internet Information Services (IIS) Manager, tìm đến website cần cấu hình. Trong khung HOME của website bạn >>> double click SSL Settings >>> bật Client Certificates = Accept >>> Apply.[/FONT]
[FONT="]
 [/FONT]
[FONT="] [/FONT]
[FONT="]Lưu ý: không chọn cấu hình Require SSL[/FONT]
[FONT="]Tiếp theo là cài đặt module URL Rewrite 2.0, bạn có thể download trực tiếp module này từ các link mà Microsoft cung cấp như sau:[/FONT]
[FONT="]+ Phiên bản 64 bit cho IIS8 >>>link tải: go.microsoft.com/?linkid=9722532[/FONT]
[FONT="]+ Phiên bản 32 bit cho IIS8 >>>link tải: go.microsoft.com/?linkid=9722533[/FONT]
[FONT="]+ Phiên bản 64 bit cho IIS7 >>>link tải: go.microsoft.com/fwlink/?LinkID=615137[/FONT]
[FONT="]+ Phiên bản 32 bit cho IIS7 >>>link tải: go.microsoft.com/fwlink/?LinkID=615138[/FONT]
[FONT="] [/FONT]
[FONT="] [/FONT]
[FONT="]2.Cấu hình trên IIS 8.x[/FONT]
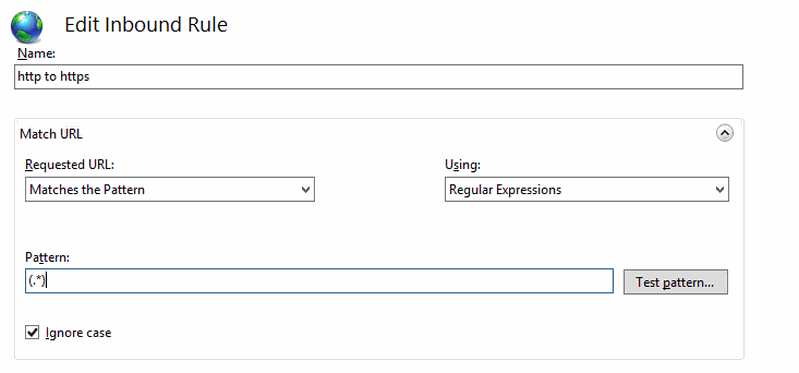
[FONT="]Sau khi cài đặt thành công cũng trong khung HOME của website cần cấu hình bạn double click URL Rewrite >>> Add Rule >>> Inbound Rule >>> Blank Rule >>> cấu hình như sau:[/FONT]
[FONT="]NAME : http to https[/FONT]
[FONT="]
 [/FONT]
[FONT="] [/FONT]
[FONT="]MATCH URL :[/FONT]
[FONT="]+ Requested URL: Matches the Pattern[/FONT]
[FONT="]+ Using: Regular Expression[/FONT]
[FONT="]+ Pattern: (.*)[/FONT]
[FONT="] [/FONT]
[FONT="]
 [/FONT]
[FONT="] [/FONT]
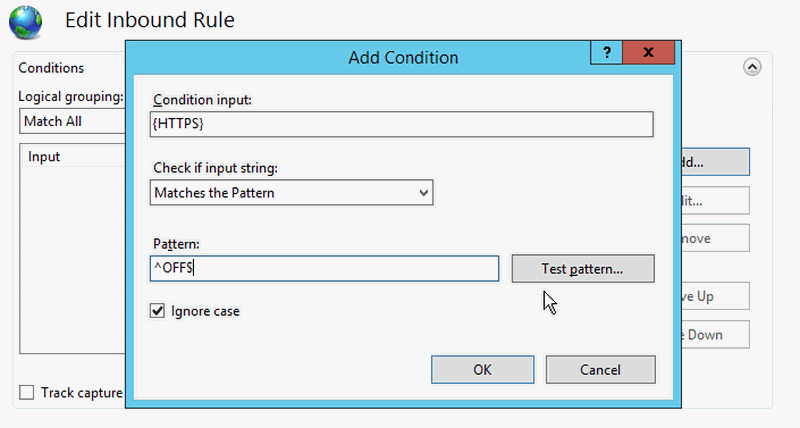
[FONT="]CONDITIONS >>> Add[/FONT]
[FONT="]+ Condition Input: {HTTPS}[/FONT]
[FONT="]+ Check if input string: Matches the Pattern[/FONT]
[FONT="]+ Pattern: ^OFF$[/FONT]
[FONT="]+ Nhấn OK[/FONT]
[FONT="] [/FONT]
[FONT="]
 [/FONT]
[FONT="] [/FONT]
[FONT="]ACTION[/FONT]
[FONT="]+ Action type: Redirect[/FONT]
[FONT="]+ Redirect URL: https://{HTTP_HOST}/{R:1}[/FONT]
[FONT="]+ Redirect type: See Other (303)[/FONT]
[FONT="]+ Nhấn Apply[/FONT]
[FONT="] [/FONT]
[FONT="] [/FONT]
[FONT="]3.Cấu hình trên IIS 7.x[/FONT]
[FONT="]Sau khi cài đặt thành công module trên, bạn bổ sung đoạn cấu hình sau vào file web.config trong thư mục gốc của website – giữa các thẻ <rewrite><rules> và </rules></rewrite> như sau:[/FONT]
[FONT="]<rule name=”Redirect to <b class=”searchkeyword”>HTTPS</b>” stopProcessing=”true”>[/FONT]
[FONT="]<match url=”(.*)” />[/FONT]
[FONT="]<conditions><add input=”{<b class=”searchkeyword”>HTTPS</b>}” pattern=”^OFF$” />[/FONT]
[FONT="]</conditions>[/FONT]
[FONT="]<action type=”Redirect” url=”<b class=”searchkeyword”>https</b>://{HTTP_HOST}/{R:1}” redirectType=”SeeOther” />[/FONT]
[FONT="]</rule>
Nguồn: wiki.matbao.net[/FONT]
[FONT="] [/FONT]
[FONT="]Để hoàn tất bước cuối cùng, cấu hình để website tự động truy cập thông qua giao thức https, bạn vui lòng tham khảo thêm hướng dẫn cấu hình từ bài viết sau:[/FONT]
[FONT="] [/FONT]
[FONT="]I. Cấu hình chuyển hướng sang https trên Linux (bao gồm cấu hình trên server linux và một số mã nguồn php thông dụng).[/FONT]
[FONT="]1.Cấu hình trên Apache[/FONT]
[FONT="]Bạn có thể dùng file .htaccess vốn luôn được hỗ trợ bởi các máy chủ chạy Apache. Mở file .htaccess và tìm đoạn sau:[/FONT]
[FONT="] [/FONT]
[FONT="]RewriteEngine On[/FONT]
[FONT="]RewriteCond %{<b class=”searchkeyword”>HTTPS</b>} !=on[/FONT]
[FONT="]RewriteRule ^.*$ <b class=”searchkeyword”>https</b>://%{SERVER_NAME}%{REQUEST_URI} [R,L][/FONT]
[FONT="]Hoặc[/FONT]
[FONT="] [/FONT]
[FONT="]RewriteEngine On[/FONT]
[FONT="]RewriteCond %{<b class=”searchkeyword”>HTTPS</b>} off[/FONT]
[FONT="]RewriteRule (.*) <b class=”searchkeyword”>https</b>://%{HTTP_HOST}%{REQUEST_URI}[/FONT]
[FONT="] [/FONT]
[FONT="] [/FONT]
[FONT="]2.Cấu hình trên Nginx[/FONT]
[FONT="]Chúng ta mở file cấu hình nginx.conf (hoặc /etc/nginx/sites-enabled/domain.conf) và tìm đoạn cấu hình cho website trên port 80, sau đó điều chỉnh như sau:[/FONT]
[FONT="] [/FONT]
[FONT="]server {[/FONT]
[FONT="]listen 80;[/FONT]
[FONT="]server_name yourdomain.com;[/FONT]
[FONT="]return 301 <b class=”searchkeyword”>https</b>://$server_name$request_uri;[/FONT]
[FONT="]}[/FONT]
[FONT="]Cuối cùng khởi động lại nginx: service nginx restart[/FONT]
[FONT="] [/FONT]
[FONT="] [/FONT]
[FONT="]3.Cấu hình trên Tomcat/JBoss[/FONT]
[FONT="]Đầu tiên bạn mở file cấu hình server.xml của Tomcat (thường nằm trong thư mục tomcat/conf) và tìm các đoạn cấu hình cho các port 80 và 443.[/FONT]
[FONT="]Trong phần cấu hình port 80 chỉnh lại như bên dưới:[/FONT]
[FONT="] [/FONT]
[FONT="]<Connector port=”443″ maxHttpHeaderSize=”8192″ maxThreads=”150″ minSpareThreads=”25″ maxSpareThreads=”75″ enableLookups=”false” disableUploadTimeout=”true” acceptCount=”100″ scheme=”<b class=”searchkeyword”>https</b>” secure=”true” SSLEnabled=”true” clientAuth=”false” sslProtocol=”TLS” keyAlias=”tomcat” keystoreFile=”/usr/local/ssl/keystore/server.jks” keystorePass=”your_keystore_password” />[/FONT]
[FONT="]<Connector port=”80″ enableLookups=”false” redirectPort=”443″ />[/FONT]
[FONT="]Tiếp theo đến file cấu hình web.xml của website và thêm vào đoạn sau đây ở cuối file, nhưng trước thẻ </web-app>[/FONT]
[FONT="] [/FONT]
[FONT="]<!– SSL settings. Only allow <b class=”searchkeyword”>HTTPS</b> access –>[/FONT]
[FONT="]<security-constraint>[/FONT]
[FONT="]<web-resource-collection>[/FONT]
[FONT="]<web-resource-name>Entire Application</web-resource-name>[/FONT]
[FONT="]<url-pattern>/*</url-pattern>[/FONT]
[FONT="]</web-resource-collection>[/FONT]
[FONT="]<user-data-constraint>[/FONT]
[FONT="]<transport-guarantee>CONFIDENTIAL</transport-guarantee>[/FONT]
[FONT="]</user-data-constraint>[/FONT]
[FONT="]</security-constraint>[/FONT]
[FONT="]Sau đó bạn cần khởi động lại Tomcat.[/FONT]
[FONT="] [/FONT]
[FONT="] [/FONT]
[FONT="]II. Cấu hình chuyển hướng sang https trên Windows (bao gồm cấu hình trên IIS các phiên bản).[/FONT]
[FONT="]1.Cấu hình chung[/FONT]
[FONT="]Đầu tiên chúng ta khởi động Internet Information Services (IIS) Manager, tìm đến website cần cấu hình. Trong khung HOME của website bạn >>> double click SSL Settings >>> bật Client Certificates = Accept >>> Apply.[/FONT]
[FONT="]
[FONT="] [/FONT]
[FONT="]Lưu ý: không chọn cấu hình Require SSL[/FONT]
[FONT="]Tiếp theo là cài đặt module URL Rewrite 2.0, bạn có thể download trực tiếp module này từ các link mà Microsoft cung cấp như sau:[/FONT]
[FONT="]+ Phiên bản 64 bit cho IIS8 >>>link tải: go.microsoft.com/?linkid=9722532[/FONT]
[FONT="]+ Phiên bản 32 bit cho IIS8 >>>link tải: go.microsoft.com/?linkid=9722533[/FONT]
[FONT="]+ Phiên bản 64 bit cho IIS7 >>>link tải: go.microsoft.com/fwlink/?LinkID=615137[/FONT]
[FONT="]+ Phiên bản 32 bit cho IIS7 >>>link tải: go.microsoft.com/fwlink/?LinkID=615138[/FONT]
[FONT="] [/FONT]
[FONT="] [/FONT]
[FONT="]2.Cấu hình trên IIS 8.x[/FONT]
[FONT="]Sau khi cài đặt thành công cũng trong khung HOME của website cần cấu hình bạn double click URL Rewrite >>> Add Rule >>> Inbound Rule >>> Blank Rule >>> cấu hình như sau:[/FONT]
[FONT="]NAME : http to https[/FONT]
[FONT="]
[FONT="] [/FONT]
[FONT="]MATCH URL :[/FONT]
[FONT="]+ Requested URL: Matches the Pattern[/FONT]
[FONT="]+ Using: Regular Expression[/FONT]
[FONT="]+ Pattern: (.*)[/FONT]
[FONT="] [/FONT]
[FONT="]
[FONT="] [/FONT]
[FONT="]CONDITIONS >>> Add[/FONT]
[FONT="]+ Condition Input: {HTTPS}[/FONT]
[FONT="]+ Check if input string: Matches the Pattern[/FONT]
[FONT="]+ Pattern: ^OFF$[/FONT]
[FONT="]+ Nhấn OK[/FONT]
[FONT="] [/FONT]
[FONT="]
[FONT="] [/FONT]
[FONT="]ACTION[/FONT]
[FONT="]+ Action type: Redirect[/FONT]
[FONT="]+ Redirect URL: https://{HTTP_HOST}/{R:1}[/FONT]
[FONT="]+ Redirect type: See Other (303)[/FONT]
[FONT="]+ Nhấn Apply[/FONT]
[FONT="] [/FONT]
[FONT="] [/FONT]
[FONT="]3.Cấu hình trên IIS 7.x[/FONT]
[FONT="]Sau khi cài đặt thành công module trên, bạn bổ sung đoạn cấu hình sau vào file web.config trong thư mục gốc của website – giữa các thẻ <rewrite><rules> và </rules></rewrite> như sau:[/FONT]
[FONT="]<rule name=”Redirect to <b class=”searchkeyword”>HTTPS</b>” stopProcessing=”true”>[/FONT]
[FONT="]<match url=”(.*)” />[/FONT]
[FONT="]<conditions><add input=”{<b class=”searchkeyword”>HTTPS</b>}” pattern=”^OFF$” />[/FONT]
[FONT="]</conditions>[/FONT]
[FONT="]<action type=”Redirect” url=”<b class=”searchkeyword”>https</b>://{HTTP_HOST}/{R:1}” redirectType=”SeeOther” />[/FONT]
[FONT="]</rule>
Nguồn: wiki.matbao.net[/FONT]
Bài tương tự bạn quan tâm
Hướng dẫn tự động chuyển hướng từ http:// sang https://
- Thread starter Mr LNA
- Ngày bắt đầu
Câu chuyện thiết kế web thường gặp
- Thread starter Mr LNA
- Ngày bắt đầu
Câu chuyện thiết kế web thường gặp
- Thread starter Mr LNA
- Ngày bắt đầu
Wix.com - Tự thiết kế Web Flash dễ dàng
- Thread starter Mr LNA
- Ngày bắt đầu
Tự động post bài viết từ blog của bạn lên Facebook...
- Thread starter Mr LNA
- Ngày bắt đầu
